[fusion_builder_container hundred_percent=”no” equal_height_columns=”no” hide_on_mobile=”small-visibility,medium-visibility,large-visibility” background_position=”center center” background_repeat=”no-repeat” fade=”no” background_parallax=”none” parallax_speed=”0.3″ video_aspect_ratio=”16:9″ video_loop=”yes” video_mute=”yes” border_style=”solid” type=”flex”][fusion_builder_row][fusion_builder_column type=”1_1″ layout=”1_1″ background_position=”left top” border_style=”solid” border_position=”all” spacing=”yes” background_repeat=”no-repeat” margin_top=”0px” margin_bottom=”0px” animation_speed=”0.3″ animation_direction=”left” hide_on_mobile=”small-visibility,medium-visibility,large-visibility” center_content=”no” last=”true” hover_type=”none” first=”true” min_height=”” link=”” background_blend_mode=”overlay”][fusion_text columns=”” column_min_width=”” column_spacing=”” rule_style=”” rule_size=”” rule_color=”” hue=”” saturation=”” lightness=”” alpha=”” content_alignment_medium=”” content_alignment_small=”” content_alignment=”” hide_on_mobile=”small-visibility,medium-visibility,large-visibility” sticky_display=”normal,sticky” class=”” id=”” margin_top=”” margin_right=”” margin_bottom=”” margin_left=”” fusion_font_family_text_font=”” fusion_font_variant_text_font=”” font_size=”” line_height=”” letter_spacing=”” text_transform=”” text_color=”” animation_type=”” animation_direction=”left” animation_color=”” animation_speed=”0.3″ animation_delay=”0″ animation_offset=””]
Download JitBit Macro Recorder FREE.
AutoHotkey is a versatile and powerful scripting language for Windows, known for its ability to automate tasks and create complex keyboard shortcuts. It’s open-source, which means it’s free to use and modify. Users can create scripts for a wide range of tasks, such as form fillers, auto-clicking, macros, and more. It offers easy-to-learn built-in commands for beginners while providing a full-fledged scripting language for more experienced developers. The syntax is flexible, supporting various programming paradigms.
The history of AutoHotkey dates back to 2003, when the first public beta was released. It was initially developed as an alternative to AutoIt, with its syntax based on AutoIt v2 and incorporating some features from AutoIt v3. Over the years, AutoHotkey has evolved, with version 1.1 becoming the main development platform in 2010 and then the official branch in late 2012. The latest version, AutoHotkey v2, was released as a beta in July 2021 and became the official primary version in January 2023.
AutoHotkey scripts can be used for a variety of purposes, such as remapping the keyboard, automating repetitive tasks, filling out forms, and even prototyping before implementing in other programming languages. Some typical examples include defining hotkeys for the mouse and keyboard, automating the opening of programs or documents, and creating auto-replace hotstrings for frequently used phrases or signatures.
Regarding script writing, it’s important to use comments effectively for clarity and maintenance. Comments in AutoHotkey begin with a semicolon (`;`) and can be placed above or inline with commands. The language also offers a `Sleep` command, which is used to introduce delays in script execution. This feature is useful for controlling script timing, especially when coordinating multiple actions or waiting for processes to complete.
For further detailed information and to explore more about AutoHotkey, you can visit their official website at [AutoHotkey](https://www.autohotkey.com/ ) and the Wikipedia page [AutoHotkey – Wikipedia](https://en.wikipedia.org/wiki/AutoHotkey ). For practical examples and an expert’s guide on using AutoHotkey, Adam the Automator offers a comprehensive guide, which can be found at [Mastering Autohotkey](https://adamtheautomator.com/ ).
In the recent past, artificial intelligence and machine learning have given way to increased automation. Despite the development, most of the tasks we do on our PC is repetitive.
Have you ever thought of automating these tasks and saving time? While most of us are familiar with AutoHotkey , today we will take a look at some of the Best free Macro Automation software for Windows 10
In this article, we will guide you through some of the best apps that will help automate tasks on Windows 10. Please mind that some of the automation software offers a paid version too – however, the free versions are sufficient for home users like you and me.
Table of contents: Best free Macro Automation software for Windows 10
Mini Mouse Macro Macro Toolworks Free Macro Recorder AutoIT Pullover’s Macro Creator AutoHotKey Related Videos Related Posts
[/fusion_text][fusion_text columns=”” column_min_width=”” column_spacing=”” rule_style=”” rule_size=”” rule_color=”” hue=”” saturation=”” lightness=”” alpha=”” user_select=”” content_alignment_medium=”” content_alignment_small=”” content_alignment=”” hide_on_mobile=”small-visibility,medium-visibility,large-visibility” sticky_display=”normal,sticky” class=”” id=”” margin_top=”50px” margin_right=”” margin_bottom=”50px” margin_left=”” fusion_font_family_text_font=”” fusion_font_variant_text_font=”” font_size=”” line_height=”” letter_spacing=”” text_transform=”” text_color=”” animation_type=”” animation_direction=”left” animation_color=”” animation_speed=”0.3″ animation_delay=”0″ animation_offset=”” logics=””]
Let us take a closer look at some of the best Best free Macro Automation software for Windows 10.
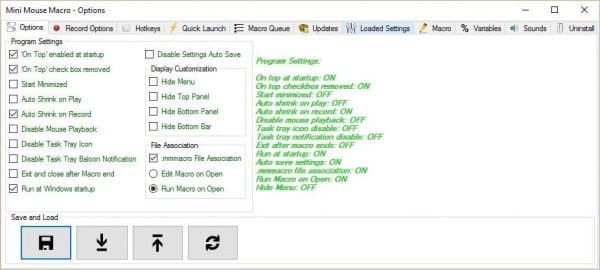
Best free Macro Automation software for Windows 10 – Mini Mouse Macro One of the Best free Macro Automation software for Windows 10 includes; Mini Mouse Macro is an open source software designed to record mouse and keyboard actions. The software is also capable of repeating the playback, and you get a simple editor to fine tune/edit the captured actions.
The mouse record feature will record the movement of your mouse and map it with respect to X and Y position. You can also define a loop count and automate the task for a predefined number of times. Mini Mouse Macro supports Script Builder, and this lets you create command lines. Download Mini Mouse Macro from the homepage .
< Goto the top of the page >
Best free Macro Automation software for Windows 10 – Macro Toolworks Free Yet another Best free Macro Automation software for Windows 10; Macro Toolwork is aimed at power users and is a powerful all-in-one automation software for Windows. Needless to say, the tool lets you record macros and then edit them in a macro editor. As a user, you can choose each Macro to be triggered in multiple ways and assign it to text shortcuts, keyboard hotkeys, time scheduler, and mouse keys. Most importantly, the Macro Toolworks records both keyboard and mouse events simultaneously.
The software is pretty useful for automating repetitive tasks like file backups, editing registry, retrieve data from Excel files and other actions. The Macro Toolworks automation software is available in three editions Free, Standard, and Professional. Scroll down and download Macro Toolworks Free from the homepage .
< Goto the top of the page >
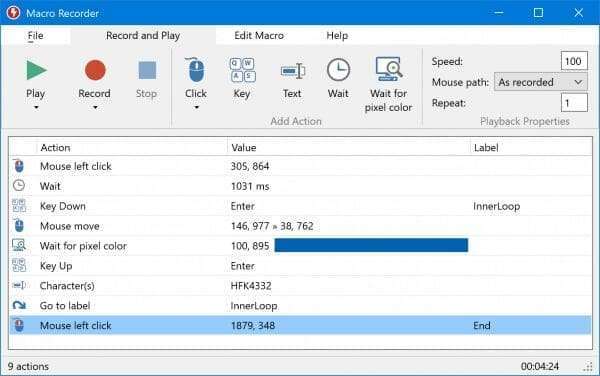
Best free Macro Automation software for Windows 10 – Macro Recorder Best free Macro Automation software for Windows 10; Macro Recorder is yet another freeware that helps automate tasks on Windows. Macro Recorder records mouse movements, clicks and a feature that lets you playback repetitive procedures. Advanced features like pixel color detection will pause macro playback and wait for a certain pixel to change colors.
The best part is that unstable mouse movements are converted into smooth swipes and this is something that will come in handy while creating video tutorials. Furthermore, the advanced recording algorithm is capable of sensing a resized program, varying resolutions and offer accurate macros.
All said and done; the Macro Recorder ended up being one of the most accurate macro automation software. Download Macro Recorder Pro from the homepage . Macro Recorder productivity boost is free-of-charge to personal users.
< Goto the top of the page >
Best free Macro Automation software for Windows 10 – AutoIT Best free Macro Automation software for Windows 10; AutoIT lets you create different types of automation and edit them to suit your requirement. As with all the other programs in this list you can automate repetitive tasks by recording mouse gestures and keystrokes. If you are an advanced user than the Auto Script Editor will help you integrate the automation with various coding tools.
That apart AutoIT can be used to change the registry entries, execute programs, automate keystrokes and create a new workflow for Windows. Download AutoIT from the homepage .
Looking for the Autoit manual and examples?
< Goto the top of the page >
Best free Macro Automation software for Windows 10 – Pullover’s Macro Creator Best free Macro Automation software for Windows 10; Are you on a lookout for a free macro creator that doesn’t cut corners? Pullover’s Macro Creator lets you write scripts, record functions and automate a wild array of tasks. The learning curve is not steep, and a normal pc user can easily understand the user interface. As a user you can set Loops, control commands, use pixel search and map it to specific functionality, devise ‘If Statements’ and map hotkey’s to the automation.
The highlight is definitely the Macro Creator. I would recommend Pullover’s Macro Creator to someone who prefers writing manual scripts rather than just recording the actions and creating automation. Download Pullover’s Macro Creator from the homepage .
< Goto the top of the page >
Macro Automation Software for Windows – AutoHotkey Best free Macro Automation software for Windows 10; AutoHotKey . This is a beginners guide to create AutoHotkey scripts. AutoHotkey AutoHotKey have .AHK extension. The programming language is easy as you shall see in this mini tutorial for AutoHotKey .
First of all, you have to download AutoHotKey and install it on your computer.Its program icon will sit in the system tray, from where you can control all your scripts. You can also suspend AutoHotkey from here for a period of time or even exit if you don’t need to run scripts. Please note that if you exit the system tray application, your scripts won’t function.
As you install AutoHotKey program, you get an option to see sample scripts in Notepad. It says SHOW README . If you keep the box checked and click Finish after installation, a Windows Help Window is launched where you can find detailed instructions on how to use the program.
IMPORTANT: Create scripts in Notepad .AHK extension so that they work. Select ALL FILES under Type (the second drop down list below Filename Text Box). It shows *.* in the related text box and there, you have to enter AHK instead of TXT . If you save as TXT , the script will not work.
The following is a brief tutorial for using AutoHotkey .
Special Keys (CTRL, ALT, SHIFT, WINDOWS KEY)
When you create scripts, you assign them to keys. In most cases you have to assign them to a combination of special keys followed by regular keys. The special keys in this regard are WINDOWS KEY , CTRL , SHIFT and ALT . You can use one or more than one special keys to assign your scripts.
For example, you might want to assign a script to CTRL + SHIFT + S .
In that case you have to type the special keys in the format provided by AutoHotKeys .
CTRL is represented by ^
SHIFT is represented by +
ALT is represented by !
Windows Key is represented by #
:: part ends the hotkey combination and script follows
Example; to begin, you first have to type the special key combination that will activate the script you created. For example, if you wish to assign CTRL + SHIFT + S to launch Google, your script will look like the following:
^+S:: Run google.com
Special Words or Commands
To launch a program or website, use RUN . For example if you create the following:
!^F:: Run Notepad
With the above script, when you press ALT+SHIFT+F , Notepad is launched. RUN is a keyword that helps you run a program or launch a website. Another example below shows you how a hotkey opens Google in your default program and then launches Notepad .
^+E::
Run google.com
Run Notepad
Return
All the four lines above are one script that is activated using CTRL+SHIFT+E . The word RETURN is another keyword that indicates end of script when you are using multiple lines. Whenever you create a script with more than one line, you should use RETURN at the end of the script so that AutoHotKey knows that the script ends here.
You can add as many commands you want into a single .AHK file, but remember to use RETURN towards the end of last script in the .AHK file. You have to launch the .AHK file by double clicking it before you can use the scripts
Another keyword worth using is SEND . It sends keystrokes to the shell and you can use it create things like signatures etc. See the following example below:
^!S::
Send Regards{ENTER}Bernie Aybout
Return
In the above script, when I press CTRL+ALT+S , it will paste Regards , followed by an Enter key (for line change) and then insert Bernie Aybout . The above example shows you how to input the ENTER key. The ENTER key is always included inside braces {}
Similarly, if you wish to input a TAB , it should be {TAB} . Likewise, space key will be {SPACE} . You need not use {SPACE} to enter a SPACE. It will automatically take in SPACE when you enter SPACE key in the script as in the above example. In the example, Bernie is followed by a SPACE and then Aybout .
AutoHotKey List of Keys (Keyboard, Mouse and Joystick)
AutoHotKey Tutorials
AutoHotKey Remapping Keys (Keyboard, Mouse and Joystick)
AutoHotKey AutoHotkey Script Showcase
< Goto the top of the page >
[/fusion_text][fusion_text columns=”” column_min_width=”” column_spacing=”” rule_style=”” rule_size=”” rule_color=”” hue=”” saturation=”” lightness=”” alpha=”” user_select=”” content_alignment_medium=”” content_alignment_small=”” content_alignment=”” hide_on_mobile=”small-visibility,medium-visibility,large-visibility” sticky_display=”normal,sticky” class=”” id=”” margin_top=”50px” margin_right=”” margin_bottom=”50px” margin_left=”” fusion_font_family_text_font=”” fusion_font_variant_text_font=”” font_size=”” line_height=”” letter_spacing=”” text_transform=”” text_color=”” animation_type=”” animation_direction=”left” animation_color=”” animation_speed=”0.3″ animation_delay=”0″ animation_offset=”” logics=””]
This section gives some of the more frequently asked questions from the forum . If you can’t find the answer you seek here then the forum should be your first port of call.
Questions
How can I run a DOS program from within AutoIt? Why can I only use Run() to execute .exe and .com files? What about .msi / .txt and others? Why do I get errors when I try and use double quotes (“) ? What do the window “title” and “text” parameters mean? Why can’t I print a variable using “My var is $vVariable”? When I use Send() to send a variable odd things happen? What is the difference between the return value and @error? How can I exit my script with a hot-key? How can I use a custom icon when compiling my scripts? How can I make sure only one copy of my script is run? What are the current technical limits of AutoIt v3? I get a missing picture symbol in the Help file under the Examples.
If you wanted to run something like a DOS “Dir” command then you must run it though the command interpreter (command.com or cmd.exe depending on your OS). The @ComSpec macro contains the correct location of this file. You should use the RunWait() function as it waits for the DOS program to finish before continuing with the next line of the script. Here is an example of running the DOS Dir command on the C: drive: (effectively running the command command.com /c Dir C:\ )
RunWait ( @ComSpec & ” /c Dir C:\” )
Back To Top
Only a few file extensions are usually “runable” – these are .exe, .bat, .com, .pif. Other file types like .txt and .msi are actually executed with another program. When you double click on a “my_installer.msi” file what actually happens in the background is that “msiexec.exe my_installer.msi” is executed. So to run a .msi file from AutoIt you would do:
RunWait ( “msiexec my_installer.msi” )
Or, run the command “start” which will automatically work out how to execute the file for you:
RunWait ( @ComSpec & ” /c Start my_installer.msi” )
Or, use the ShellExecuteWait function which will automatically work out how to execute the file for you:
ShellExecuteWait ( “my_installer.msi” )
Back To Top
If you want to use double-quotes inside a string then you must “double them up”. So for every one quote you want you should use two. For example if you wanted to set a variable to the string: A word in “this” sentence has quotes around it! You would do:
$vVar = “A word in “”this”” sentence has quotes around it!”
or use single quotes instead:
$vVar = ‘A word in “this” sentence has quotes around it!’
Back To Top
Back To Top
If you have a variable called $msg and you want to print in inside a MsgBox then this will NOT work:
#include
MsgBox ( $MB_OK , “Example” , “My variable is $msg” )
It will actually print My variable is $msg . What you need to do is tell AutoIt to join the string and the variable together using the & operator:
#include
MsgBox ( $MB_OK , “Example” , “My variable is “ & $msg )
Advanced: If you have many variables to add into a string then you may find the StringFormat() function useful. For example, if I wanted to insert $vVar1 to $vVar5 into a string then it may be easier to do:
#include
Local $sMessage = StringFormat ( “Var1 is %s, Var2 is %s, Var3 is %s, Var4 is %s” , $vVar1 , $vVar2 , $vVar3 , $vVar4 ) MsgBox ( $MB_SYSTEMMODAL , “” , $sMessage )
Back To Top
If you are sending the contents of a variable then be mindful that if it contains special send characters like ! ^ + {SPACE} then these will be translated into special keystrokes – rarely what is wanted. To overcome this use the RAW mode of Send() that does not translate special keys:
Send ( $vMyVar , 1 )
Back To Top
Generally a return value is used to indicate the success of a function. But, if a function is already returning something ( like WinGetText() ) then we need to have a way of working out if the function was successful, so we set @error instead.
Back To Top
Ah, an easy one. If you want to make your script exit when you press a certain key combination then use the HotKeySet() function to make a user function run when the desired key is pressed. This user function should just contain the Exit keyword.
Here some code that will cause the script to exit when CTRL+ALT+x is pressed:
HotKeySet ( “^!x” , “MyExit” ) … … ; Rest of Script … … Func MyExit () Exit EndFunc ;==>MyExit
Back To Top
Back To Top
Use the _Singleton() function. See the User Defined Functions documentation for more information on _Singleton() and how to use it.
Back To Top
Please refer to the Limits and Defaults section for the technical limits of AutoIt3.
Additional information about theoretical limits of AutoIt3.
Value
Description
No limit
Maximum number of GUI windows.
No limit
Maximum number of use defined functions.
No limit
Maximum number of variables in use at one time.
1.7E308 to 1.7E+308
Number range (floating point) with 15-digit precision.
0x8000000000000000 to 0x7FFFFFFFFFFFFFFF
Hexadecimal number range (32-bit/64-bit signed integer).
Back To Top
This should be the Open button that enable you to open the Examples in the Help file.
Back To Top
Running Scripts
When you start AutoIt you will be asked to open a script file . A script file is a simple text file containing AutoIt keywords and functions that tell AutoIt what you want it to do. Script files are created in a simple text editor such as notepad.exe but there is a much better alternative in a specially modified version of the SciTE editor.
Although AutoIt v3 scripts are just plain-text files they are usually given the file extension .au3 to differentiate between a script and a plain text file. If you used the full installer to install AutoIt you can execute an AutoIt script simply by double-clicking it. There are also various options to open, edit, or compile a script if you right-click on the .au3 file.
Here is an example script. Notice that ; is used for commenting sections of code:
#include
; This is my first script MsgBox ( $MB_SYSTEMMODAL , “My First Script!” , “Hello World!” )
More complicated scripts can introduce functions. These are usually placed towards the end of a script or below the Global variable declaration section.
#include
MsgBox ( $MB_SYSTEMMODAL , “My second script!” , “Hello from the main script!” )
Example_Func ()
Func Example_Func () Return MsgBox ( $MB_SYSTEMMODAL , “My Second Script!” , “Hello from the functions!” ) EndFunc ;==>Example_Func
Passing command line parameters to your own executable is achievable in AutoIt. Passed commandline parameters can be viewed by using the constant variables $CmdLine and $CmdLineRaw. Assigning these variables with new data will cause AutoIt to return an error, as these cannot be changed during the script’s execution. Note that both variables exist whether commandline parameters are passed or not.
The special array $CmdLine is initialized at the start of the script with the command line parameters passed to your AutoIt script. If running your script instead of the executable, then the ScriptName.au3 willl be ignored as a parameter.
If you’re passing strings with spaces, then you will need to escape these using “double quotes” in your commandline string.
$CmdLine [ 0 ] ; Contains the total number of items in the array. $CmdLine [ 1 ] ; The first parameter. $CmdLine [ 2 ] ; The second parameter. … $CmdLine [ nth ] ; The nth parameter e.g. 10 if the array contains 10 items.
So if you were to run your script directly using AutoIt3.exe:
AutoIt3 .e xe myScript . au3 param1 “This is a string parameter” 99
$CmdLine [ 0 ] ; This contains 3 parameters. $CmdLine [ 1 ] ; This contains param1 and not myScript.au3 as this is ignored when running non-compiled. $CmdLine [ 2 ] ; This contains This is a string parameter. $CmdLine [ 3 ] ; This contains 99. $CmdLineRaw ; This contains myScript.au3 param1 “This is a string parameter” 99.
So if you were to use the compiled executable by passing commandline parameters:
myProg . exe param1 “This is a string parameter” 99
$CmdLine [ 0 ] ; This contains 3 parameters. $CmdLine [ 1 ] ; This contains param1. $CmdLine [ 2 ] ; This contains This is a string parameter. $CmdLine [ 3 ] ; This contains 99.
AutoIt specific command Line Switches
The AutoIt3.exe interpreter, or the interpreter stub of any compiled Autoit script, can normally be used to run AutoIt scripts directly from the command line. In all cases the /ErrorStdOut switch allows the redirection of a fatal error to StdOut which can then be captured by an application such as the SciTE editor. This switch can be used with both the interpreter and a compiled script.
Run a script using the interpreter :
AutoIt3.exe [/ErrorStdOut] [/AutoIt3ExecuteScript] filename [params …] Execute the AutoIt3 script ‘filename’ with optional parameters
At its simplest: AutoIt3.exe myScript.au3 will run a standard AutoIt script ‘myScript.au3’ with no parameters.
Run a compiled script :
Compiled.exe [/ErrorStdOut] [params …]
Run a single line of code :
AutoIt3.exe [/ErrorStdOut] /AutoIt3ExecuteLine “command line”
The command below will execute that single line of code and display the MsgBox with “Hello World!”. The tray icon will not be displayed.
Run ( @AutoItExe & ‘ /AutoIt3ExecuteLine “MsgBox(4096, ”Hello World!”, ”Hi!”)”‘ )
Run a script using another compiled script :
Compiled.exe [/ErrorStdOut] /AutoIt3ExecuteScript file [params …]
Compiled.exe [/ErrorStdOut] /AutoIt3Execute Line “command line”
This means that there is no need to have a copy of AutoIt3.exe in addition to the compiled file – the interpreter stub of the compiled file will replace it. So as long as there is at least one compiled script available, other AutoIt scripts can be run without the need to have AutoIt3.exe on the machine., either pre-installed or added via FileInstall.
Important Notes
However, the executable must have been compiled with the #pragma compile(AutoItExecuteAllowed, True) directive as the default setting does not permit use of the /AutoItExecuteScript or /AutoItExecuteLine parameters. Moreover, since the interpreter stub searches for any required standard #include files in its current folder, UDF functions and various constants may not be available as those files are normally only found in the full AutoIt install. It is therefore recommended that any scripts intended to be run in this manner are compiled to the .a3x format rather then being left as plain .au3 text files
Correct usage of single and double quotation marks is important when using the command line – even for double single quotation marks.
Language Reference – Datatypes
AutoIt uses a Variant implementation to represent variables and constants. Variables and constants can contain numeric or string data and AutoIt decides how to interpret the datatype depending on the situation, although you can force a particular datatype if required.
This means that if you use a mathematical operator on 2 variables they will be treated as numbers; if you concatenate (join) them they will be treated as strings. Note that the datatype of the result of the operation may not be the same as that of the original variables:
For example, using * to multiply two values returns a number
10 * 20 : results in the number 200
Whereas using & to concatenate (join) two values returns a string
10 & 20 : results in the string “1020”
In each case an implicit call to the Number() or String() function is made to convert the value to the appropriate type, which may result in unexpected results. For instance, if a string value does not contain a valid number, it will be assumed to equal 0. For example,
10 * “fgh” : results in the number 0.
Beware of this automatic conversion as it can cause problems if you do not explicitly declare the exact datatype of the content of a variable. For example, values read from an .ini file are ALWAYS strings and so a simple comparison between them can lead to peculiar results as strings are compared alphabetically:
“11” will be considered less than “2”
rather then numerically
11 is considered greater than 2
You are advised to make use of the Number() and String() functions to force the contents of variables and constants into the same format before carrying out any comparisons between them.
Remember that VarGetType() can be used to ascertain the actual datatype of variables, literals and constants.
Numbers
Supported types are signed integers and floating-point: Int32, Int64 and Double. Bitsize of an integer depends on its magnitude and is automatically adjusted.
Numbers can be standard decimal numbers: 2 , 4.566 , -7 .
Scientific notation is also supported: i.e. 1.5e3 instead of 1500 .
Integers (whole numbers) can also be represented in hexadecimal notation by preceding the integer with 0x : e.g. 0x409 or 0x4fff .
Enum is a keyword of the language but is not a datatype per se, since enumerated values directly map to integers.
Strings
Native AutoIt string use the UCS2 character set (the first 64k codepoints of Unicode, also called the BMP). They are enclosed in double-quotes like “this” .
$s = “abc”
If you want a string to actually contain a double-quote use it twice:
“here is a “”double-quote”” – ok?”
You can also use single-quotes like ‘this’ and ‘here is a ‘ ‘single-quote’ ‘ – ok?’
You can mix quote types to make for easier working and to avoid having to double-up your quotes to get what you want. For example if you want to use a lot of double-quotes in your strings then you should use single-quotes for declaring them:
‘This “sentence” contains “lots” of “double-quotes” does it not?’
is much simpler than:
“This “”sentence”” contains “”lots”” of “”double-quotes”” does it not?”
When evaluated, strings can have Env variables or Var variables substitution according to Opt() function definition.
It is recommended to use UTF8 for source file encoding. See (to be written) for more details on how to convert strings to/from UCS2, UTF8, etc and how to deal with codepages.
Booleans
Booleans are logical values and only two exist: True and False . They can be assigned to variables and constants and used with the Boolean operators And , Or and Not .
Examples:
$bBoolean1 = True
$bBoolean1 = False
Strings and numbers can be used as Booleans. An empty string “” equals Boolean False as does the number 0. Any other number value will be equal to Boolean True
Example:
$iNumber1 = 0
It is strongly advised not to use Booleans in arithmetic expressions, but the following rules apply in this case:
A Boolean True will be converted into the numeric value 1False will be converted into the numeric value 0
Example:
$bBoolean1 = True
Concatenating Booleans with strings converts the Boolean value into the appropriate string: “True ” or “False “:
Example:
$bBoolean1 = True
However, when using string comparisons with Boolean values, the following rules apply:
Only an empty string (“”) will be a Boolean False .True .
Binary
Binary type can store any byte value. they are converted in hexadecimal representation when stored in a string variable. Example:
$dBin = Binary(“abc”)
Pointer
Pointer types store a memory address which is 32bits or 64bits depending on if the 32bit or 64-bit version of AutoIt is used. They are converted to hexadecimal representation when stored in a string variable. Window handles (HWnd) as returned from WinGetHandle() are a pointer type.
Variables created with DllStructCreate() can be used as pointer if a ‘struct*’ type in the DllCall() is used. A pointer defined by DllStructGetPtr() can be passed to such parameter with a ‘struct*’ type.
DllStruct
This datatype is used for mapping AutoIt data to C/C++ structs for invoking functions in DLLs.
Keyword
AutoIt uses 4 Keywords as datatypes
True Boolean True – e.g. 7 = 7False Boolean False – e.g. 5 >= 14Default Only used for assigning a default value to optional arguments of a function.Null An unknown value. (Note this keyword is NOT part of a 3-valued logic as in other languages such as SQL).
Object
Object refers to a “Component Object Model” as used by Microsoft. Creating an object allows you to use Autoit code to interact with it using the object’s various properties and/or methods. See for more discussion on using COM within AutoIt.
Function and User Function
AutoIt has both native functions and user-defined functions – the former being part of the core AutoIt code while the later are written as AutoIt scripts either within an include library file or by you within your own script. Both types are first-class objects and can be assigned to a variable, or used as a parameter and/or return value from another function. See for more details.
Arrays and Maps
AutoIt has 2 types of data collection variables: Array and Maps .
Arrays are much faster for random access and can have multiple dimensions – a dimension size is fixed at the initially declared value (although it can be altered using ReDim()
Maps are better for records/dictionary type access and have a single dimension. They are indexed using either integer or string keys (integers do not refer to the order of elements) and are dynamically resized as values are added or removed. A value can only be accessed by using the original key – these keys can be iterated using the MapKeys() function.
See for more details.
Datatypes and Ranges
The following table shows the internal variant datatypes and their ranges.
Data Sub-type
Range and Notes
Int32
A 32bit signed integer number.
Int64
A 64bit signed integer number
Double
A double-precision floating point number.
String
Can contain strings of up to 2147483647 characters.
Binary
Binary data, can contain up to 2147483647 bytes.
Pointer
A memory address pointer. 32bit or 64bit depending on the version of AutoIt used.
Some functions in AutoIt only work with 32-bit numbers (e.g. BitAND() ) and are converted automatically – these functions are documented where required.
Language Reference – Operators
AutoIt has the following assignment, mathematical, comparison, and logical operators.
Operator
Description
Assignment operators
=
Assignment e.g. $vVar = 5 (assigns the number 5 to $vVar )
+=
Addition assignment e.g. $vVar += 1 (adds 1 to $vVar )
-=
Subtraction assignment
*=
Multiplication assignment
/=
Division assignment
Concatenation operators
&
Concatenates/joins two strings e.g. “one” & 10 (results in “one10” and not 11 )
&=
Concatenation assignment e.g. $vVar = “one” , and then $vVar &= 10 ($vVar is now “one10” )
Mathematical operators
+
Adds two numbers e.g. 10 + 20 (is the result of 30 )
–
Subtracts two numbers e.g. 20 – 10 (is the result of 10 )
*
Multiplies two numbers. e.g. 20 * 10 (is the result of 200 )
/
Divides two numbers. e.g. 20 / 10 (is the result of 2 )
^
Raises a number to the power. e.g. 2 ^ 4 (is the result of 16 )
Comparison operators (case-insensitive if used with strings except for == )
=
Tests if two values are equal. e.g. If $vVar = 5 Then (true if $vVar equals 5 ). Case-insensitive when used with strings. See below about comparing with mixed datatypes.
==
Tests if two strings are equal. Case-sensitive. The left and right values are converted to strings if they are not strings already. This operator should only be used if string comparisons need to be case-sensitive.
<>
Tests if two values are not equal. Case-insensitive when used with strings. To do a case-sensitive not equal comparison use Not ( “string1” == “string2” )
>
Tests if the first value is greater than the second. Strings are compared lexicographically even if the contents of the string happen to be numeric.
>=
Tests if the first value is greater than or equal to the second. Strings are compared lexicographically even if the contents of the string happen to be numeric.
<
Tests if the first value is less than the second. Strings are compared lexicographically even if the contents of the string happen to be numeric.
<=
Tests if the first value is less than or equal to the second. Strings are compared lexicographically even if the contents of the string happen to be numeric.
Logical operators
And
Logical And operation e.g. If $vVar = 5 And $vVar2 > 6 Then (True if $vVar equals 5 and $vVar2 is greater than 6 )
Or
Logical Or operation e.g. If $vVar = 5 Or $vVar2 > 6 Then (True if $vVar equals 5 or $vVar2 is greater than 6 )
Not
Logical Not operation e.g. Not 1 (False )
Conditional operator
? :
Select conditionally an expression. e.g. $condition ? $expression1 : $expression2 ($expression1 if $condition is True or $expression2 if False ) See the Ternary operator for an example.
Precedence
When more than one operator is used in an expression the order in which things happen is controlled by operator precedence . The precedence used in AutoIt is given below. Where two operators have the same precedence the expression is evaluated left to right .
From highest precedence to lowest:
Not ^ And Or
e.g. 2 + 4 * 10 is evaluated as 42 :
4 * 10 (equals 40 )
2 + 40 (equals 42 )
As the * has a higher precedence than + it occurs before the addition.
Although the operator precedence should suffice in most cases, is recommended to use brackets to force the order of evaluation if the result is critical or if the expression is complex.
e.g. ( 2 + 4 ) * 10 equals 60 .
This is particularly true for the – operator which can be used for both binary subtraction (subtraction of 2 numbers)and unary negation (setting the negative of a value). The use of brackets is highly recommended in this case to prevent confusion.
Short-circuiting
Note the following when using the logical operators And, Or:
e.g. If MyFunc1 () Or MyFunc2 () Then (MyFunc2 () is not called if MyFunc1 () returns true
e.g. If MyFunc1 () And MyFunc2 () Then (MyFunc2 () is not called if MyFunc1 () returns false
Comparing different datatypes
Care is needed if comparing mixed datatypes, as unless the case-sensitive (== ) string operator is used, mixed comparisons are usually made numerically. Most strings will be evaluated as 0 and so the result may well not be the one expected. It is recommended to force the items being compared into the same datatype using Number()/String() before the comparison.
#include
Local $iNumber = 0 Local $sString = “Some string”
; This will evaluate to true, as the string is converted to a number i.e. zero If $iNumber = $sString Then MsgBox ( $MB_SYSTEMMODAL , “” , $iNumber & ” and ‘” & $sString & “‘ are equal” ) EndIf
; This will evaluate to false, as the string and number are compared by value and datatype If $iNumber == $sString Then MsgBox ( $MB_SYSTEMMODAL , “” , $iNumber & ” and ‘” & $sString & “‘ are equal” ) EndIf
Language Reference – Conditional Statements
You will often want to change the flow of your script based on a condition or series of conditions. Is one number bigger than another? Or, does a string contain a certain value?
Conditions are evaluated as True (non-zero) or False (zero). Conditions generally use comparison operators like == , <> , >= .
The following conditional statements are available in AutoIt:
If…Then…Else
Select…Case
Switch…Case
Ternary
All three statements are similar and decide which code to execute depending on the condition(s) given. Here is an example of an If statement that pops up a message box depending on the value of a variable.
#include
Local $iNumber = – 20
If $iNumber > 0 Then MsgBox ( $MB_SYSTEMMODAL , “Example” , “$iNumber was positive!” ) ElseIf $iNumber < 0 Then MsgBox ( $MB_SYSTEMMODAL , “Example” , “$iNumber was negative!” ) Else MsgBox ( $MB_SYSTEMMODAL , “Example” , “$iNumber was zero.” ) EndIf
A Select statement is very similar, but is generally used for situations where you want to test a large number of conditions as it is generally easier to read than a large If/ElseIf type block. e.g.
#include
Local $iNumber = 30
Select Case $iNumber > 1 And $iNumber <= 10 MsgBox ( $MB_SYSTEMMODAL , “Example” , “$iNumber was greater than 1” )
Case $iNumber > 10 And $iNumber <= 20 MsgBox ( $MB_SYSTEMMODAL , “Example” , “$iNumber was greater than 10” )
Case $iNumber > 20 And $iNumber <= 30 MsgBox ( $MB_SYSTEMMODAL , “Example” , “$iNumber was greater than 20” )
Case $iNumber > 30 And $iNumber <= 40 MsgBox ( $MB_SYSTEMMODAL , “Example” , “$iNumber was greater than 30” )
Case $iNumber > 40 MsgBox ( $MB_SYSTEMMODAL , “Example” , “$iNumber was greater than 40” ) EndSelect
A Switch statement is very similar to Select statement, but is generally used for situations where the same expression is tested against some different possible values.
#include
Local $iNumber = 30
Switch Int ( $iNumber ) Case 1 To 10 MsgBox ( $MB_SYSTEMMODAL , “Example” , “$iNumber was greater than 1” )
Case 11 To 20 MsgBox ( $MB_SYSTEMMODAL , “Example” , “$iNumber was greater than 10” )
Case 21 To 30 MsgBox ( $MB_SYSTEMMODAL , “Example” , “$iNumber was greater than 20” )
Case 31 To 40 MsgBox ( $MB_SYSTEMMODAL , “Example” , “$iNumber was greater than 30” )
Case Else MsgBox ( $MB_SYSTEMMODAL , “Example” , “$iNumber was greater than 40 or less or equal to 0” )
EndSwitch
With each of these structures, the first condition that is true controls which group of statements get executed. All subsequent conditions and their associated statements get ignored.
A Ternary statement can be used when there is a simple binary choice to be made it avoids the overhead of the structures associated with the other conditional statements.
#include
MsgBox ( $MB_SYSTEMMODAL , “Result: 1=1” , ( 1 = 1 ) ? “True!” : “False!” ) MsgBox ( $MB_SYSTEMMODAL , “Result: 1=2” , ( 1 = 2 ) ? “True!” : “False!” )
Language Reference – Loop Statements
A loop is how you refer to a section of script that you repeat a number of times. You might want to loop a given number of times or you might wish to repeat a section of script as long as a certain condition is true or false.
The following loop statements are available in AutoIt:
For…Next
While…WEnd
Do…Until
For…In…Next
While all the statements perform similar functions, they are slightly different and one will usually be more appropriate than another for a given situation.
A loop with little or no interior code will use CPU cycles very rapidly and in the worst case could cause overheating. A Sleep(10) line within the loop is sufficient to prevent this – note that this is not required if the code within the loop contains a blocking function (e.g. MsgBox) or GUIGetMsg.
Keyword Reference
For…To…Step…Next
Loop based on an expression.
Parameters
variable
The variable used for the count.
start
The initial numeric value of the variable.
stop
The final numeric value of the variable.
stepval
[optional] The numeric value (possibly fractional) that the count is increased by each loop. Default is 1.
Remarks
The variable will be created automatically with Local scope, even when MustDeclareVars is on.
For…Next statements may be nested. The For loop terminates when the value of variable exceeds the stop threshold. If stepVal or stop is a variable, its value is only read the first time the loop executes.
A For loop will execute zero times if:start > stop and step > 0, orstart < stop and step is negative
#include
For $i = 5 To 1 Step - 1
MsgBox ( $MB_SYSTEMMODAL , "" , "Count down!" & @CRLF & $i )
Next
MsgBox ( $MB_SYSTEMMODAL , "" , "Blast Off!" )
[/fusion_text][fusion_text columns=”” column_min_width=”” column_spacing=”” rule_style=”default” rule_size=”” rule_color=”” hide_on_mobile=”small-visibility,medium-visibility,large-visibility” class=”” id=”” animation_type=”” animation_direction=”left” animation_speed=”0.3″ animation_offset=””]
Macro Automation Recording FAQs
Top Macro Automation Recording Software to Boost Your Productivity: A Comprehensive Guide with Links
Learn more about JavaScript Operators
Jitbit Macro Recorder Automation Tool
Python Basic Operators
[/fusion_text][/fusion_builder_column][/fusion_builder_row][/fusion_builder_container]